Happy March! We made it through the longest February in the history of Februaries! And I believe it ended up being the fourth snowiest month EVER. And we're ringing in March with more of the white stuff, so that's fun. In like a lion, right?
This week's recipe was for a fun twist on meatballs, and although she made them as a party snack, I made them for dinner with rice and snap peas.
(Here's the Smitten Kitchen post).
You'll need:
(for the sauce...)
1/2 cup brown sugar
1/2 cup water
1/2 cup soy sauce
1/2 cup mirin
1/4 cup peeled, chopped garlic
1 teaspoon ground coriander
4 whole black peppercorns
(for the meatballs...)
1 pound ground turkey
4-6 small scallions, finely chopped
half bunch cilantro, finely chopped
1 egg
2 tablespoons sesame oil
2 tablespoons soy sauce
freshly ground black pepper
vegetable oil
Start by combining the brown sugar and water. Heat it up until the sugar dissolves.
Add the remaining sauce ingredients. Simmer over medium-low heat until reduced by half, about 30 minutes. (She recommends longer, which I did, and it still didn't get very syrupy).
In the meantime, combine all of the meatball ingredients (except the vegetable oil).
Mix well, preferably with your hands. ;)
The mixture is pretty soft, but form into about 24 meatballs. She mentions that damp hands work well for this part. I put them in the fridge for a bit at this point.
Heat a skillet over medium-high heat and generously coat with vegetable oil. Drop meatballs in and cook about 4 minutes before flipping and cooking another 4 minutes.
They were hard to get browned all over, so I ended up with something more like mini meatball patties than actual meatballs. Oh well. ;) (I also kept them on a pan in a 200-degree oven while I cooked the rest)
Drizzle with the glaze and sprinkle with additional scallions or cilantro.
Final verdict: These were....fine. :) Not my favorite, but Dan and Jack both really liked them. I might try them with ground beef next time instead of turkey. I've also never seen a meatball recipe without some sort of breadcrumb component, so I might add that too. But it was fun to try something new, and the glaze was really tasty!
Happy weekend, friends!
"He says, 'Be still and know that I am God.' Be still and know. Be still. Be. It starts with 'be.' Just be, dear one." Shauna Niequist
Friday, March 01, 2019
Friday, February 22, 2019
SK week 8 | Easiest Baked Mac and Cheese
Smitten Kitchen has a few macaroni and cheese recipes on the website, so obviously I picked "the easiest" one. :) It was perfect comfort food in the midst of this very snowy month.
(Here's the Smitten Kitchen post)
You'll need:
2 tablespoons butter
1 cup cottage cheese (not low fat)
2 cups milk (not skim)
1 teaspoon dry mustard
pinch cayenne
1/2 teaspoon salt
1/4 teaspoon pepper
1 pound sharp or extra-sharp cheddar cheese, grated (reserve 1/4 cup for topping)
1/2 pound elbow macaroni, uncooked
Heat oven to 375 degrees and use one tablespoon of butter to grease a 9-inch baking dish.
Blend up the cottage cheese, dry mustard, cayenne, salt, and pepper until really smooth.
Add the milk and blend.
Pour that mixture into a bowl.
Add the cheese...
Then it looks all golden and delicious. :) Let it sit for 15 minutes before digging in.
Serve with something green. ;)
Final verdict: We all really liked it (even picky Leah, who has very strong feelings about macaroni and cheese). It worked well with GF pasta and it was great for how quick and easy it was to throw together. That said, I wanted it creamier. I like the taste of cheddar cheese, but I might mix it with a better melting cheese next time. I don't know. Maybe it's just the nature of baked mac and cheese, but it felt a little dry. But again, no one complained!
Happy Friday, friends!
(Here's the Smitten Kitchen post)
You'll need:
2 tablespoons butter
1 cup cottage cheese (not low fat)
2 cups milk (not skim)
1 teaspoon dry mustard
pinch cayenne
1/2 teaspoon salt
1/4 teaspoon pepper
1 pound sharp or extra-sharp cheddar cheese, grated (reserve 1/4 cup for topping)
1/2 pound elbow macaroni, uncooked
Heat oven to 375 degrees and use one tablespoon of butter to grease a 9-inch baking dish.
Blend up the cottage cheese, dry mustard, cayenne, salt, and pepper until really smooth.
Add the milk and blend.
Pour that mixture into a bowl.
Add the cheese...
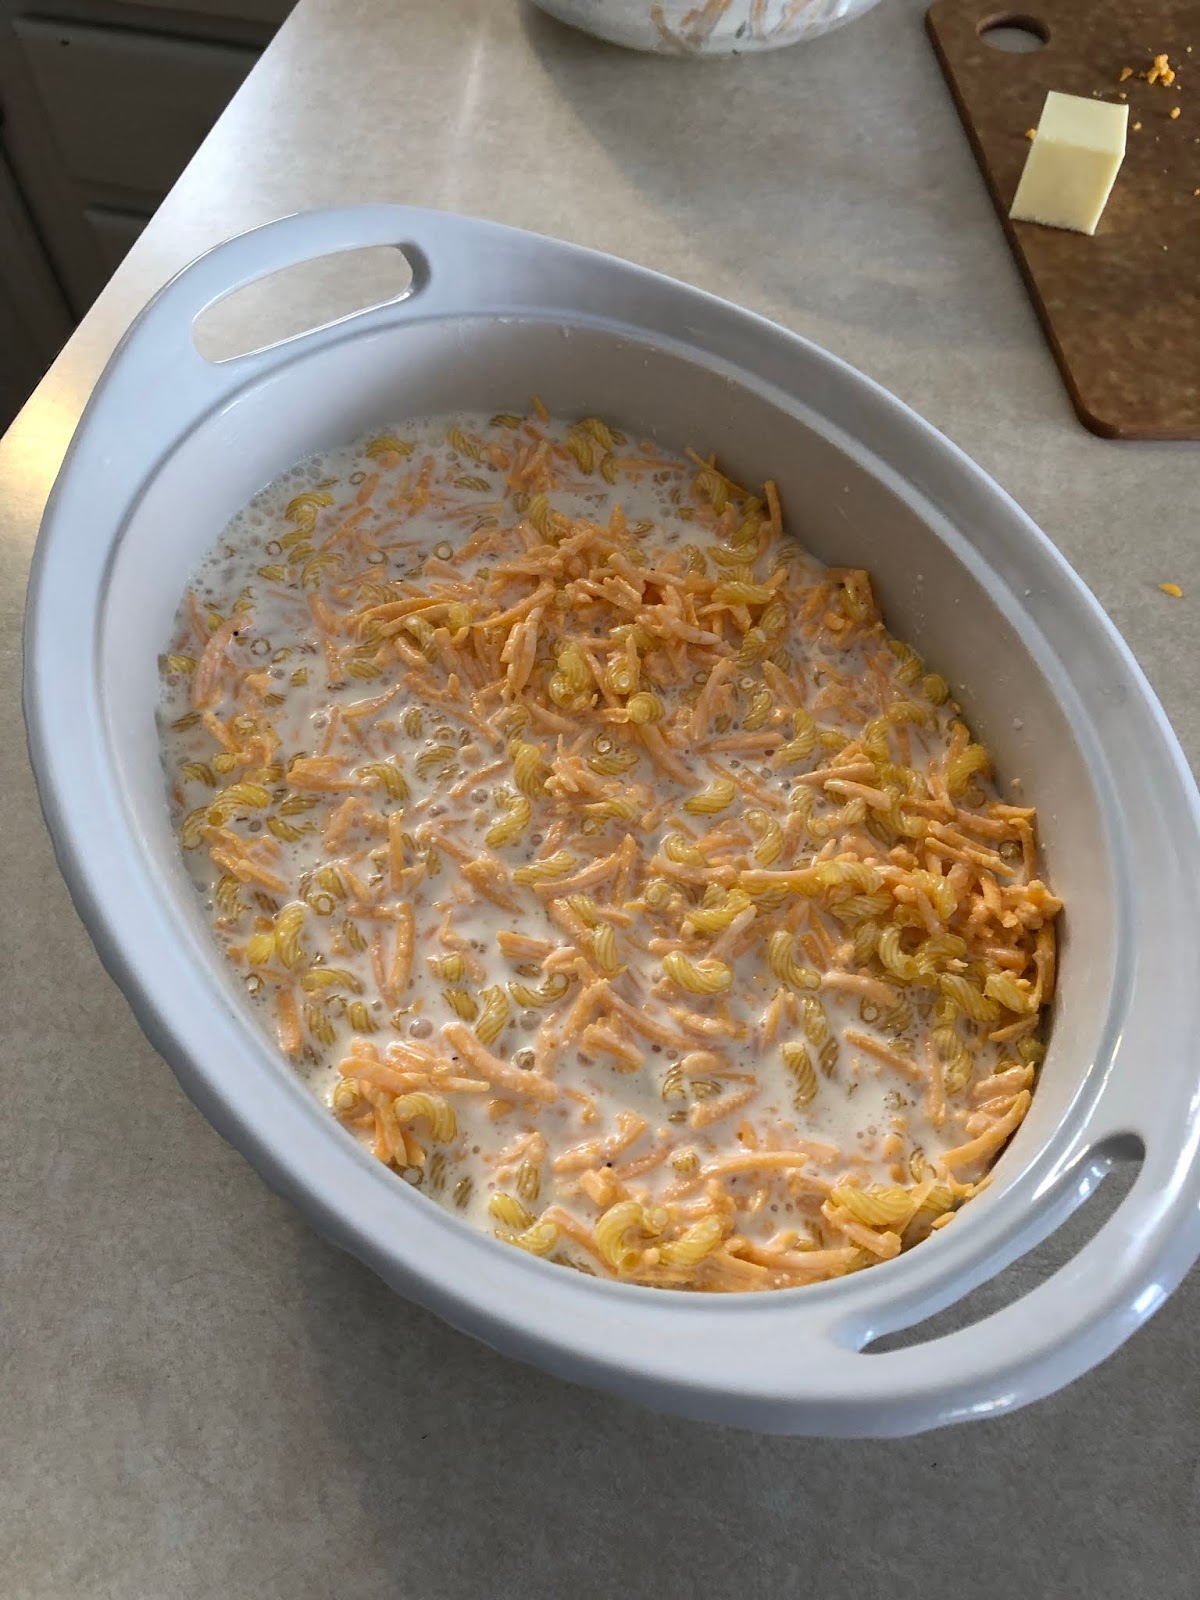
And the uncooked macaroni.
Stir that up. It looks super unappetizing. ;)
Pour into your prepared baking dish.
Cover with foil and bake for 30 minutes.
Remove and stir a bit.
Sprinkle with the reserved cheese and dot with butter. Return to oven for another 30 minutes.
Serve with something green. ;)
Final verdict: We all really liked it (even picky Leah, who has very strong feelings about macaroni and cheese). It worked well with GF pasta and it was great for how quick and easy it was to throw together. That said, I wanted it creamier. I like the taste of cheddar cheese, but I might mix it with a better melting cheese next time. I don't know. Maybe it's just the nature of baked mac and cheese, but it felt a little dry. But again, no one complained!
Happy Friday, friends!
Thursday, February 14, 2019
SK week 7 | Black Bottom Cupcakes
Smitten Kitchen posted this recipe a week or two ago and I decided it sounded like a perfect dessert for Valentine's Day. So I made them for our Tuesday night friends this week and....everyone hated them. Kidding--but we'll get to the verdict later. ;)
(Here's the Smitten Kitchen post)
You'll need:
(for the filling...)
8-ounce package cream cheese, at room temperature
1/3 cup sugar
1 egg
2 ounces chopped chocolate or 1/2 cup chocolate chips
(for the cupcakes...)
1 1/2 cups flour (I used GF)
5 tablespoons cocoa powder
1 teaspoon baking soda
1/4 teaspoon salt
1 cup firmly packed brown sugar
1 cup water
1/3 cup vegetable oil
1 tablespoon vinegar
1 teaspoon vanilla
Preheat your oven to 350 and take a mixer to the cream cheese.
Then beat in the sugar....
And the egg.
Stir in the chocolate chips (I ended up using mini chocolate chips, not the ones in the photo, because I didn't feel like chopping them).
Put that aside while you make the cupcake batter. (I actually stuck it in the fridge).
Measure your flour, cocoa, baking soda, and salt.
Whisk those together and set aside. (If your flour or cocoa are lumpy, better sift them).
Combine your remaining ingredients--brown sugar, water, oil, vinegar, and vanilla.
Whisk those together.
Make a well in your dry ingredients...
And pour the wet mixture into it.
Stir together until just combined. Don't over mix.
Line your muffin tin with cupcake liners.
Fill the liners about half full with the cupcake batter.
Then grab your cream cheese mixture from the fridge. And grab a scoop or spoon.
Plop some of this mixture into each cup (it ended up being a scoop plus a little to use up all the cream cheese mixture).
Then top with a little more of the cupcake batter. (I started getting a little nervous here. These cups got really full. But it all worked out).
Swirl the tops of each cup to combine the two mixtures a little bit. Pop them in your preheated oven and bake for about 25 minutes (mine needed an extra minute or two).
They definitely spilled over the edges a little bit, but not too bad. :) The centers will sink a little as they cool--perfectly normal.
Cool them on the counter and then stick them in the fridge before serving. They taste best cold with that cheesecake center. And no need for frosting--they're magical as is. ;)
Final verdict: We all loved them! And I was impressed that they translated to gluten-free so well without any other tweaks. We did kind of want some sort of fruit component. I'd even just drop a raspberry on each top, in that perfectly sunken center--that would be cute.
Overall these were pretty easy and definitely a crowd-pleaser. I'll for sure make them again! Enjoy!
(Here's the Smitten Kitchen post)
You'll need:
(for the filling...)
8-ounce package cream cheese, at room temperature
1/3 cup sugar
1 egg
2 ounces chopped chocolate or 1/2 cup chocolate chips
(for the cupcakes...)
1 1/2 cups flour (I used GF)
5 tablespoons cocoa powder
1 teaspoon baking soda
1/4 teaspoon salt
1 cup firmly packed brown sugar
1 cup water
1/3 cup vegetable oil
1 tablespoon vinegar
1 teaspoon vanilla
Preheat your oven to 350 and take a mixer to the cream cheese.
Then beat in the sugar....
And the egg.
Stir in the chocolate chips (I ended up using mini chocolate chips, not the ones in the photo, because I didn't feel like chopping them).
Put that aside while you make the cupcake batter. (I actually stuck it in the fridge).
Measure your flour, cocoa, baking soda, and salt.
Whisk those together and set aside. (If your flour or cocoa are lumpy, better sift them).
Combine your remaining ingredients--brown sugar, water, oil, vinegar, and vanilla.
Whisk those together.
Make a well in your dry ingredients...
And pour the wet mixture into it.
Stir together until just combined. Don't over mix.
Line your muffin tin with cupcake liners.
Fill the liners about half full with the cupcake batter.
Then grab your cream cheese mixture from the fridge. And grab a scoop or spoon.
Plop some of this mixture into each cup (it ended up being a scoop plus a little to use up all the cream cheese mixture).
Then top with a little more of the cupcake batter. (I started getting a little nervous here. These cups got really full. But it all worked out).
Swirl the tops of each cup to combine the two mixtures a little bit. Pop them in your preheated oven and bake for about 25 minutes (mine needed an extra minute or two).
They definitely spilled over the edges a little bit, but not too bad. :) The centers will sink a little as they cool--perfectly normal.
Cool them on the counter and then stick them in the fridge before serving. They taste best cold with that cheesecake center. And no need for frosting--they're magical as is. ;)
Final verdict: We all loved them! And I was impressed that they translated to gluten-free so well without any other tweaks. We did kind of want some sort of fruit component. I'd even just drop a raspberry on each top, in that perfectly sunken center--that would be cute.
Overall these were pretty easy and definitely a crowd-pleaser. I'll for sure make them again! Enjoy!
Tuesday, February 12, 2019
My Valentine
Last weekend, Dan and I escaped to tropical (ha) Duluth and had just the best time. For the second year in a row, this is what we request as a Christmas gift from my parents--money toward a hotel and a weekend of watching our kids.
This particular trip was pretty cold and pretty snowy. Which was perfect for staying in and doing a whole lot of nothing! We ventured out (see photographic evidence below) for lunch on Saturday. And then back to our room and the romantic comedy marathon we'd happened upon earlier in the day.
At some point in the weekend, we realized that it was exactly 19 years ago that we were just starting to date. We'd started hanging out in January and were approaching our very fancy first "real date" on Valentines Day. More than once in the conversation, we said something along the lines of "What a difference 19 years makes!" (Oddly enough, I was 19 at the time. I have been with Dan as long as I was without him. Ha!)
Nineteen years ago we were young (so young!) and had no idea what lay ahead of us. We had no idea how much more we would love each other after almost 17 years of marriage and a handful of kids. We didn't know how hard life could be or how sweet. We certainly didn't know how much we'd enjoy a quiet hotel weekend, eating pizza in bed and watching Sweet Home Alabama. ;)
I love you, Dan Bennett! So glad you're mine. :)
This particular trip was pretty cold and pretty snowy. Which was perfect for staying in and doing a whole lot of nothing! We ventured out (see photographic evidence below) for lunch on Saturday. And then back to our room and the romantic comedy marathon we'd happened upon earlier in the day.
At some point in the weekend, we realized that it was exactly 19 years ago that we were just starting to date. We'd started hanging out in January and were approaching our very fancy first "real date" on Valentines Day. More than once in the conversation, we said something along the lines of "What a difference 19 years makes!" (Oddly enough, I was 19 at the time. I have been with Dan as long as I was without him. Ha!)
Nineteen years ago we were young (so young!) and had no idea what lay ahead of us. We had no idea how much more we would love each other after almost 17 years of marriage and a handful of kids. We didn't know how hard life could be or how sweet. We certainly didn't know how much we'd enjoy a quiet hotel weekend, eating pizza in bed and watching Sweet Home Alabama. ;)
I love you, Dan Bennett! So glad you're mine. :)
| So bright. So cold. |
Thursday, February 07, 2019
SK week 6 | Double Chocolate Banana Bread
Does anyone else bake more in the winter? And does anyone else buy bananas mostly so they can sit on your counter and get perfectly ripe for banana bread? :) I have another recipe for chocolate banana bread, but I liked the simplicity of this one when I saw the recipe. My other one requires my mixer and calls for sour cream, which I don't always have on hand. Plus, it makes two loaves, which we can't quite get through before I feel like I should probably throw the rest away. (Yes, I should freeze the second loaf, and I have, but sometimes I don't think things through).
(Here's the Smitten Kitchen post)
You'll need:
3 ripe bananas (about 1 cup mashed)
1/2 cup butter, melted
3/4 cup brown sugar
1 egg
1 teaspoon vanilla
1 teaspoon baking soda
1/4 teaspoon salt
1 cup flour (I used GF)
1/2 cup cocoa powder
1 cup chocolate chips
Preheat your oven to 350 and grease a loaf pan.
Mash your bananas. I use a potato masher, but you do you.
Whisk in the melted butter,
the brown sugar,
and the egg and vanilla.
Measure the dry ingredients into a sifter.
No lumps!
Mix all that together.
Add the chocolate chips and mix again.
Pour batter into prepared loaf pan. Bake 55-65 minutes. Check it with a toothpick--mine was good at about an hour.
Cool and try to resist cutting into it when it's piping hot.
I couldn't resist. ;) But I should have--either because it was a little too warm or because I made it gluten free, it was a little crumbly. But once it was room temp, it sliced much better and held its shape.
Final verdict: Big hit. I don't think my kids even knew it was a different recipe, and they love any and all banana bread. I liked that it was a one-bowl recipe with no oddball ingredients. :)
Have a wonderful weekend! Maybe enjoy all the snow we've acquired this week. ;) (And don't forget Giveaway Day is Sunday!)
(Here's the Smitten Kitchen post)
You'll need:
3 ripe bananas (about 1 cup mashed)
1/2 cup butter, melted
3/4 cup brown sugar
1 egg
1 teaspoon vanilla
1 teaspoon baking soda
1/4 teaspoon salt
1 cup flour (I used GF)
1/2 cup cocoa powder
1 cup chocolate chips
Preheat your oven to 350 and grease a loaf pan.
Mash your bananas. I use a potato masher, but you do you.
Whisk in the melted butter,
the brown sugar,
and the egg and vanilla.
Measure the dry ingredients into a sifter.
No lumps!
Mix all that together.
Add the chocolate chips and mix again.
Pour batter into prepared loaf pan. Bake 55-65 minutes. Check it with a toothpick--mine was good at about an hour.
Cool and try to resist cutting into it when it's piping hot.
I couldn't resist. ;) But I should have--either because it was a little too warm or because I made it gluten free, it was a little crumbly. But once it was room temp, it sliced much better and held its shape.
Final verdict: Big hit. I don't think my kids even knew it was a different recipe, and they love any and all banana bread. I liked that it was a one-bowl recipe with no oddball ingredients. :)
Have a wonderful weekend! Maybe enjoy all the snow we've acquired this week. ;) (And don't forget Giveaway Day is Sunday!)
Subscribe to:
Posts (Atom)